Shower Tile Installation
Set Yourself Up for Success
By: Brett Mauney
// A properly installed shower can keep water and moisture from seeping through floors and walls, preventing mold, the warping of the framework and the soaking of priceless assets not intended for water contact. Photo: Merkrete.
Setting tile in shower spaces can seem a treacherous assignment for many new installers due to the painstaking surface preparation and waterproofing that must be completed before laying tile one. An improperly installed shower can be disastrous for property owners when water and moisture seep through the floors and walls, creating mold, warping the framework and soaking priceless assets not intended for water contact. These costs are often deferred to the installer if waterproofing forensics reveals nonadherence to industry standards. The good news is that there are helpful key points to keep in mind. There are also products on the market to simplify and better protect installations to help ensure the subsurface, customer and tilers are protected.
Perform Due Diligence
Before doing anything, it’s fundamental to ensure that the substrate is ready to accept tile-setting products. TCNA guidelines provide all the information needed for a number of tile shower installation situations, so find the ones that are right for your project.
Be sure to fill all substrate voids and cracks that will complicate the installation and potentially cause failure. Shower floors need proper slope to help water run off the membrane and into the drain as quickly as possible. Generally, a ¼ inch of slope per foot will do the job, but it’s imperative to check local code requirements. For slope adjustments, products like Merkrete’s Underlay RS will form a proper slope base foundation on surfaces where none is present.
Another factor that can upend a tile shower installation is incorrect drain usage. You’ll want to ensure the drain meets local code requirements as well. It’s also a great idea to contact the drain manufacturer directly to determine the product’s suitability for your installation. Not every drain is designed for installation with waterproofing membranes, so it’s best to have the right products lined up before beginning any work on the shower.
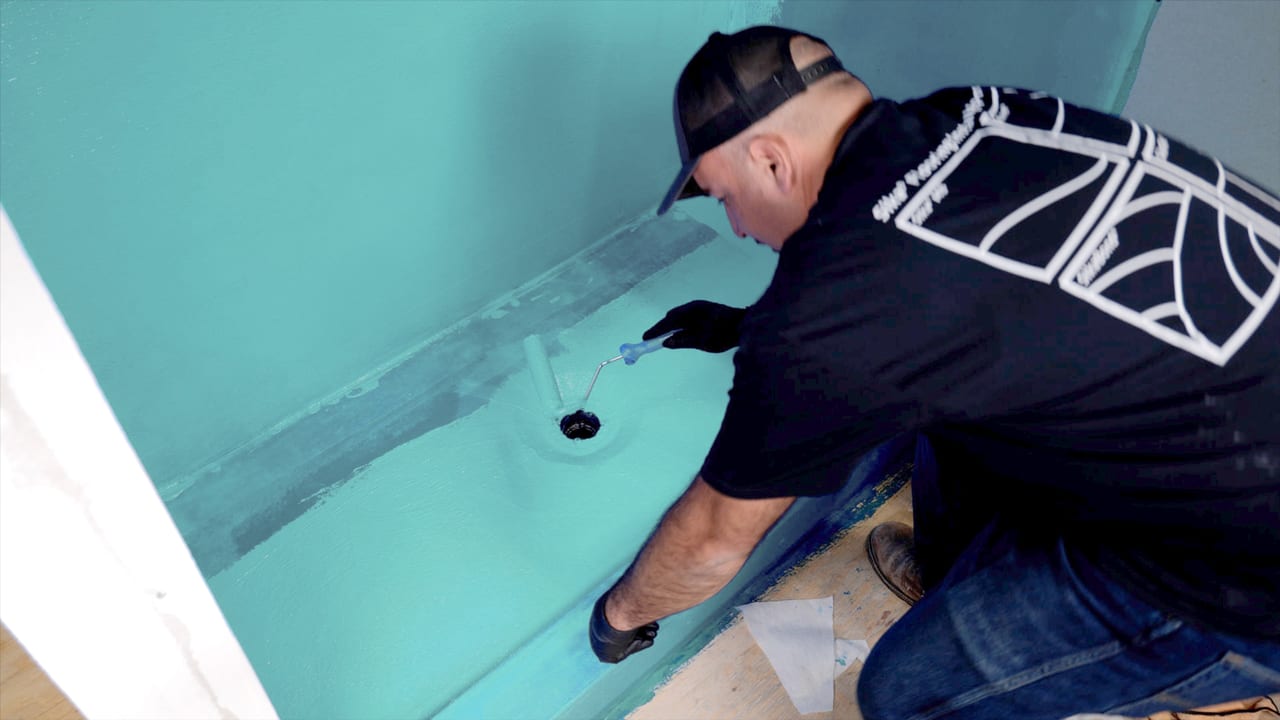
// Liquid-applied membranes give you a choice of placement levels. They can be applied between the pre-slope and mud bed or more commonly, atop the mud bed with a direct bond to the tile. Regardless of method, the membrane must tie into the weep holes on the approved shower drain. Photo: Merkrete.
Weigh Your Waterproofing Options
You’re going to need to waterproof. It’s likely the most important procedure you’ll complete throughout the installation process. Water will make its way through cementitious grout via microscopic capillaries formed during its drying process. That water will start to host mold, damage materials beyond the substrate and degrade the adhesive bond. And, no, sealing the grout is not sufficient waterproofing. A waterproofing system meeting or exceeding ANSI A118.10 is required.
There are a number of waterproofing options, but the main two are sheet membranes and liquid-applied membranes. Both satisfy the ANSI requirement and both perform well when applied correctly. However, they each have very different application methods that demand various levels of skill.
Prefabricated sheet membranes come in a variety of styles, and each has its own specific installation process. It’s vital to consult manufacturer’s specifications and instructions every time you select a new product. Sheet membranes need to be trimmed and assembled to fit the shape of the space. They have seams that must be joined properly for the length of the run, and this becomes more difficult with the introduction of plane changes and penetrations. In short, sheet membranes demand more skill to apply correctly, are more costly overall and more labor intensive than the liquid-applied type.
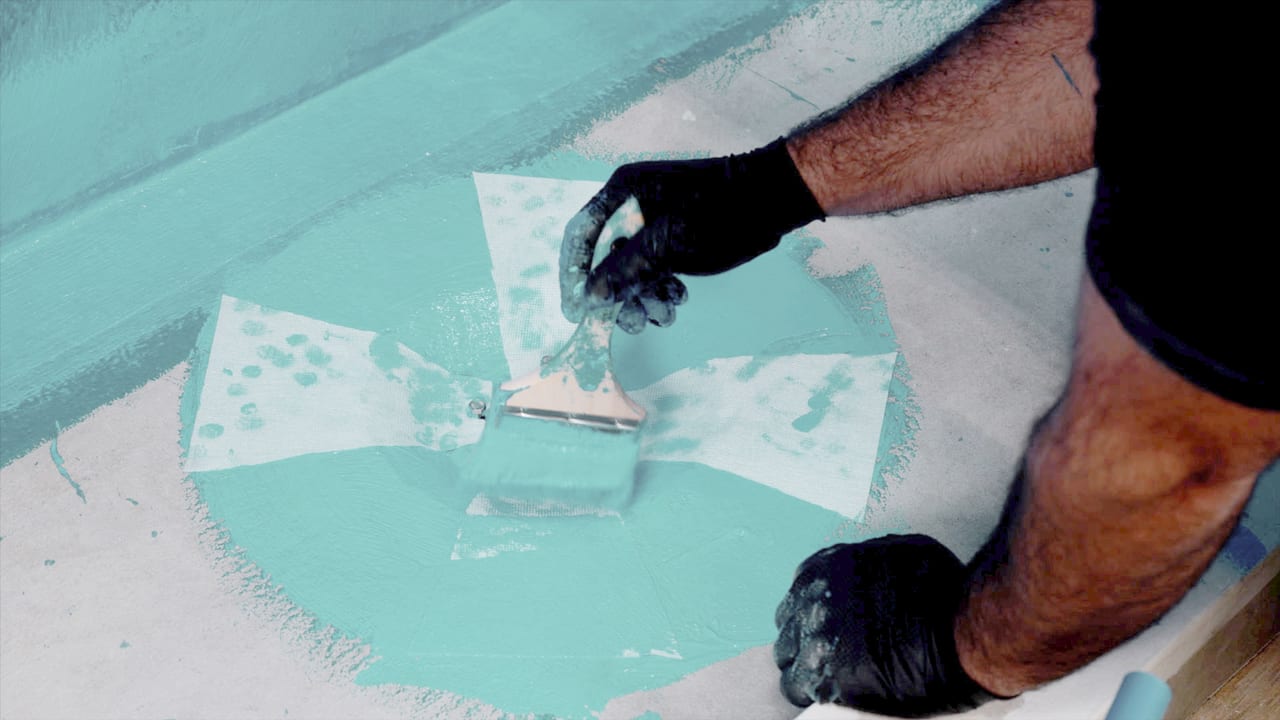
Liquid-applied membranes provide fully seamless monolithic coverage for the surface needing waterproofing. The thin, load-bearing waterproof barrier is incorporated into the drain assembly, producing uninterrupted water runoff from the slope. They are less costly than sheet membranes and much simpler to apply.
Paint brush and roller are the easiest methods for applying the membranes, though many can be applied with small V-notch trowels or airless sprayers. Always follow the chosen manufacturer’s instructions. A liquid-applied membrane's lack of seams eliminates potential leak points and use with reinforcing fabrics lends greater strength and consistent thickness to the membrane. What’s more, products like Merkrete’s Hydro Guard family provide exceptional crack isolation protection, inhibiting the transfer of substrate fractures up to 1/8” wide to the finished tile surface.
// A liquid-applied membrane’s lack of seams eliminates potential leak points and using it with reinforcing fabrics lends greater strength and consistent thickness to the membrane. Photo: Merkrete.
Liquid-Applied Membranes: Tricks for Shower Applications
Liquid-applied membranes give you a choice of placement levels. They can be applied between the pre-slope and mud bed or, more commonly, atop the mud bed with a direct bond to the tile. Regardless of method, the membrane must tie into the weep holes on the approved shower drain.
Changes of plane and corners are usually where you start applying the first coat. These spots are normally treated with embedded fabric. Products like Merkrete’s Type II Reinforcing Fabric can easily be used at these plane changes and cut for inside and outside corners. Some liquid-applied membranes don’t require additional fabric, leaving a “field area” of just membrane alone. When using a full-fabric system like Merkrete’s Hydro Guard 2000, the fabric is placed over the first wet coat of membrane and “sandwiched” with a second coat on top. Again, consult manufacturer data sheets to be sure you are using the correct solution for your waterproofing needs.
The data sheets will also tell you how thick your membrane should be. The Hydro Guard series, for example, requires a wet thickness of 30 mil. A simple wet mil gauge will let you know how close to the required thickness you are applying. And if you’re thinking “the thicker, the better,” stop. A heavy buildup of liquid membrane can cause the center of the membrane to dry more slowly than the surface, remaining wet longer and potentially leading to failure.
Most liquid-applied membrane systems call for two coats. The first is the primary coat and the second is what I like to call the “cautionary coat” that covers any possible pinholes that may have appeared during drying. After your final coat, you need to wait until the membrane system is completely dry before walking on it and setting tile. Disturbing the membrane while it is still wet can damage it and lead to failure.
Once dry, it’s time to flood test. This is the time to ensure that your waterproofing system will perform as needed before any materials are installed over the membrane. No installer wants to return to a project to rip and replace a beautifully laid tile shower pan because of a costly flaw in waterproofing. Throughout the flood test period, remember to completely fill the waterproofed space with water and to not add to it or allow any to drain. It’s also a good idea to place a pan of water near the area being flood tested, exposing it to the same evaporative conditions so it can provide a baseline water level to reference at the end of the test.
Find Your Manufacturing Partner
Although shower installations require extra steps and greater care, they are very manageable with the right products and dependable support. Not all products and manufacturers are the same, so thoroughly familiarize yourself with those you choose. Most leading waterproof systems have technical representatives ready to assist with the entire installation process. Examine your options and choose a manufacturer as invested in your success as you are.

Brett Mauney, CTC, CTI, is Merkrete’s technical sales manager, managing the company’s extensive technical training. Mauney’s career stretches back to 1988, working all sides of the tile industry to include ceramic tile and setting materials manufacturing, installation, sales and distribution. Since 2007, he has provided comprehensive technical support for Merkrete’s renown tile setting materials.
About the Author >>